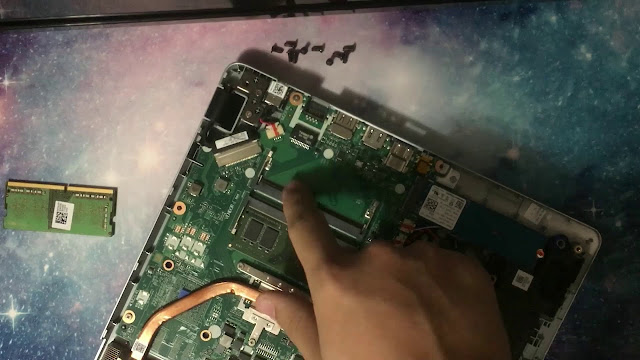
If you've bought the Acer Aspire 5 A515-45-R3SU we've recently reviewed you might find that the RAM available on the notebook is a little tight for your needs. Specifically, this model houses 8 GB of DDR4 RAM, 4 GB soldered onto the motherboard and another slot with a 4 GB SODIMM unit placed to give you an optimal performance.
However, while 8 GB of RAM is good and well for someone who manages a bunch of tabs and a couple of programs open at any given time, it can be a bit tight for people looking to make the most out of the AMD Ryzen 7 5700U processor.
If you want to get the most out of this notebook then we will definitely recommend upgrading the RAM on the Acer Aspire 5 A515-45-R3SU with a maximum 16 GB of additional RAM which is the amount that the laptop supports on the available port.
But: how do you upgrade the RAM on the Aspire 5 A515-45-R3SU in 5 minutes or less?
First off you'll need to actually get your hands on a compatible RAM module.
We would recommend either getting an 8 GB DDR4 3200 MHz SODIMM RAM module or take it all the way to the maximum 16 GB DDR4 3200 MHz SODIMM module.
There's a bit of a price difference between the two but if you're a power user then you'll definitely appreciate going all the way to 16 GB, which will give you a total 20 GB of RAM on the Aspire 5 A515-45-R3SU, if not now then a couple of years from now when you see you've easily future-proofed this mid-range laptop.
Step 1: First off you want to power off your A515-45-R3SU.
Step 2: Unscrew the bottom half of the laptop, it has 10 screws. Once you've done this it's very important that you don't use anything metallic going forward since metal is an electrical conductor.
Step 3: Now that the base has been removed you should unplug the battery.
Step 4: Locate the RAM slots. You'll find 4 GB soldered onto the base of the laptop and another available slot. It's a 260 pin slot which should look something like this:
Step 5: You will want to place the RAM upside down and place it within the available memory slot. You will want to hear a "click" sound - assuming the RAM is unclasped-.
Step 6: Connect the battery again - or you device won't start-.
Step 7: Screw the bottom lid back onto the laptop.
Step 8: Turn the laptop on and check that it has taken the RAM upgrade properly. To do so head over to the "device specifications" window. First go to "Start menu" > "About"> "about your PC" and that's where you'll find "device specifications". Within that window you should be able to see something called "Installed RAM" which will now show you the amount of RAM you've got on your device.


