Over the last few years we've bared witness to laptop manufacturers deciding, at some point, that 8 GB of RAM was enough for most users and they simply sticked to producing mid range laptops with 8 GB. That's why today, unless you're looking at a high-end laptop, it's fairly rare to find a laptop that features 12 or 16 GB of RAM. Instead, what these manufacturers have done is produce laptops that are easily upgradeable by the user, transferring the cost to the user and letting him decide if he needs more memory or not.
The latest example of this trend comes from one of Amazon's best-selling laptops, the HP 14-fq1021nr, a very affordable PC that's managed to top the list in more than one occasion thanks to its great price/spec ratio. And today we're going to walk you through the process of upgrading the RAM on the HP 14-fq1021nr. A fairly straightforward upgrade that won't take you much more than 3-5 minutes.
HP 14-fq1021nr Memory Upgrade Tutorial
What type of RAM do I need? How much RAM does this laptop support?
As far as the amount of memory you can upgrade towards, this laptop takes up to
16 GB, 8 GB on each of its two available slots. It comes by default with a single 8 GB RAM module so to upgrade the memory the least you will want to do is get a
second compatible 8 GB memory module.
Having said that, we should point out that the most recommended course of action would be to
upgrade both modules at the same time so you can make sure you're using the exact same specs on both modules and the laptop is working with dual-channel RAM. Nevertheless, this is a personal call.
How do I upgrade the RAM on the HP 14-fq1021nr?
To open the laptop up you're going to need a Philips screwdriver and anything you can use to pry open the laptop. There's
dedicated kits to pry open a laptop, but anything similar to these plastic prying tools will do the trick.
Step 1: As we always say when talking about laptop upgrades, the first thing you're going to want to do is turn the laptop off and make sure it's disconnected from the power source. You don't want to get any sorts of discharge when you're performing the upgrade. Once the laptop is turned off - not hibernating - you can go ahead and flip it upside down and remove both the visible screws as well as the screws that are located below the grey bumpers. You want to remove the bumpers gently.
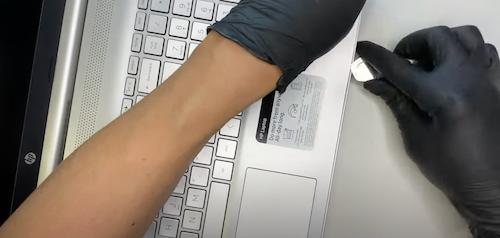
Step 2: Once the screws have been removed you're going to make use of a prying tool to pry the laptop open like the image below shows:

Step 3: Once you've managed to pry open the laptop, you'll see the internals of the HP 14-fq1021nr. You'll quickly notice the two RAM slots located on the upper-side. One of the slots is already taken by the onboard RAM and the other slot is empty.
If you've chosen to upgrade both slots then you'll need to first remove the onboard RAM. To do so simply pull outwards on the clasps located on the side of the RAM slots. This will release the memory at a 45-degree angle and you'll be able to remove it and have two empty RAM slots.
Step 4: Now you're going to go ahead and insert the RAM you've bought on the memory slot. If you're upgrading both slots to use the same RAM - as is recommended - then you'll be doing the same step twice.
Specifically, what you want to do is place the RAM at a 45-degree angle, making sure the notch on the module and the slot align. Once they're aligned you are going to press the RAM to insert it properly and then press down. There's a clicking sound, that's the sound of the clasps clutching onto the RAM.
Step 5: Finally, you're going to go ahead and re-attach the bottom case of the 14-fq1021nr, place the screws back in their places and turn the laptop on. If you want to confirm that the upgrade went well simply head over to device specifications and you'll see the new amount of memory reflected in the system.
As you can see, it's a pretty easy upgrade, and it's very doubtful that this would take you any more than 5 minutes tops. All you need to do is open the laptop up, locate the RAM slots, insert the RAM module and place the lid back on. Essentially, one of the easiest upgrades that you can do.


