When it comes down to speeding up a laptop's performance there's only so many things you can do in the software department before you need to take a look at the hardware department.
Undoubtedly, one of the easiest and most efficient ways by which you can improve your laptop's speed and overall performance is by upgrading the memory. And today that's exactly what we're going to do as we walk you through the process of upgrading the RAM on the HP 15-f272wm.
This is a simple process, you don't need to have any sort of special knowledge to pull this off and you should be done with it in roughly 5 minutes.
How To Upgrade The RAM On The HP 15-f272wm
What Type Of RAM Module Do I Need? How Much Memory May I Install?
Before you get your screwdriver you need to know what type of module your laptop can use and how much memory it can support. In the case of the HP 15-f272wm, you're going to need to get your hands on a
DDR3L PC3L-12800 1600MHz SODIMM memory module. That's a third-generation DDR3 RAM module clocking in at 1600 MHz.
You should also note that the HP 15-f272wm comes with a single RAM slot which is occupied by the RAM that the laptop shipped with so you're going to need to swap out the onboard RAM for the module that you bought.
Finally, in regards to the amount of RAM that you may install, this laptop supports up to
8 GB of compatible RAM. You could also upgrade to 4 GB but we would seriously encourage you to upgrade to 8 GB to make the most out of the laptop's hardware.
Step By Step RAM Upgrade For the HP 15-f272wm
For this process, you're going to need a screwdriver and that's about it. Unlike the
Lenovo ThinkPad T590 RAM upgrade we covered earlier, you don't need to remove the bottom case to swap out the RAM module. All you need to do is remove the lid that's covering the RAM module. It couldn't be easier.
Step 1: Turn off your laptop, disconnect it from the power source, and disconnect any accessories that you may have connected to the 15-f272wm.
Step 2: As an extra precaution you may also remove the battery. This isn't really necessary but it's something you may do if you feel more comfortable. To do that all you need to do is press inwards on the two slidable hinges located right below the laptop like so:
Step 3: Once that's out of the way, grab your screwdriver and remove the two screws attaching the RAM lid to the laptop.
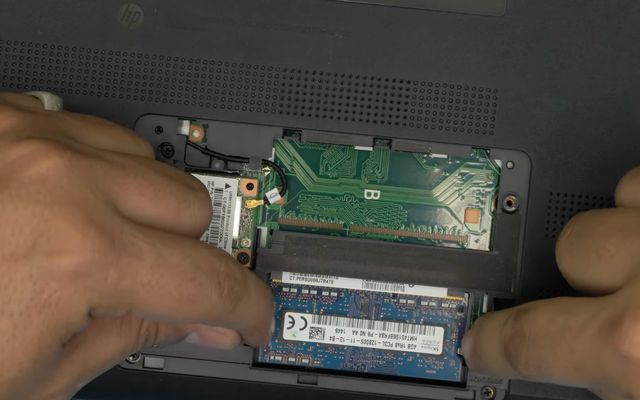
Step 4: Once the lid has been removed all you need to do is press outwards on the latches located on the sides of the RAM slot. This will release the RAM at a 45-degree angle. At that point, all you need to do is pull the RAM module out.
Step 5: Now that you have removed the onboard RAM you can grab the memory module you've bought for this and introduce it at a 45-degree angle. To make sure you're introducing the module properly make sure that the notch on the memory slot and the notch on the module align. Once they are aligned you can insert the RAM module into the slot like so:
Step 6: When you have the memory module on the memory slot you need to press down. When you do this you'll hear a clicking sound once the clasps on the side of the slot attach themselves to the new module.
Step 7: Finally, with the memory upgrade complete you're going to place the lid back on the laptop re-attaching the two screws you removed earlier. Place the battery back on if you removed it earlier in the tutorial and then, with the laptop turned on, head over to "Device Specifications". Under "Installed Memory" you should be able to see the memory you've upgraded towards.
And that's it! You have upgraded the RAM on the 15-f272wm. 8 GB isn't a whole lot by today's standards but it's sure going to be a noticeable difference. Enjoy the upgrade!


