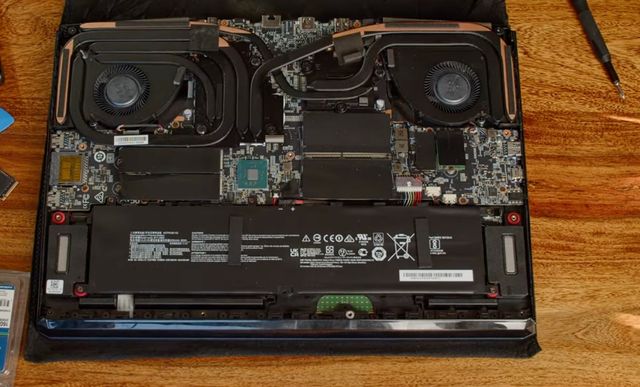
We've already talked about how to upgrade the RAM on an MSI GE76 Raider series laptop. However, as you might already know, the other feature that you can easily upgrade on a gaming laptop is the storage. Specifically, unlike most traditional laptops which will feature a single PCIe port and a SATA port, gaming laptops will often include a secondary PCIe port where you can introduce your own M.2 PCIe NVMe storage drive.
Such is the case with the popular MSI GE76 Raider. This is a big deal because it allows you not only to include more storage on your laptop but to include REALLY FAST storage. While your standard SATA drive will often clock in at 550 MB/s, an M.2 PCIe NVMe storage unit will typically blow this speed out of the water with many units surpassing the 7000 MB/s.
Today, we're going to cover how it is that you can upgrade the storage on the MSI GE76 Raider so that you may not only get more when it comes to storage but also achieve a higher performance as a result of really fast read/write speeds.
MSI GE76 Raider Storage Upgrade Tutorial
What Type of Storage Do I Need? How Much Storage May I Use?
Before you go to Amazon and buy the first storage unit that you come across you must know exactly what type of storage drive is compatible with the GE76. Specifically, the board on this laptop will support
M.2 (2280) PCIe NVMe Gen 3 SSD units.
Now, within this type of SSD units, there's a lot to choose from.
We would recommend going for a Samsung 980, these units are s
pectacularly fast and that's something that you're really going to notice on a daily basis.
As far as storage capacity goes, MSI hasn't specified a particular capacity which generally means that you can introduce any capacity that you deem convenient.
Step-By-Step Storage Upgrade Guide
For this storage installation, you're going to need a screwdriver and a prying tool. When it comes to prying tools to help open up a laptop most people will opt for a guitar pick. However, as long as it's not metallic you can use whatever you have on hand. You could even use a credit card if you're in a pinch.
Additionally, you would also benefit from using antistatic gloves to perform this upgrade.
Step 1: Make sure that the MSI GE76 Raider is turned off and disconnected from its power source. It should also be disconnected from any accessories. Place it on its back and remove all the screws attaching the bottom case to the body of the notebook.
Step 2: When you've removed all the screws grab the guitar pick or whatever you're using as a prying tool and start to separate the bottom case from the laptop. You'll come across clips on the inside of the laptop, you'll want to pull them outwards to release the case. When that's done you'll have access to your laptop's motherboard.
Step 3: Now that you have opened the laptop, locate the SSD slot and remove the screw on the lower end of it. After you have removed the screw at the bottom, insert the SSD drive into its slot. Unlike a RAM upgrade, there's no wrong way to do this.
Step 4: Once you have placed the SSD's pins in the available slot you're going to grab the screw you removed previously and use it to hold the SSD in its place like so:
Step 5: Now that the SSD is screwed tight you're going to go ahead and place the lid back into the laptop. Turn the laptop on and you should be able to see the new storage unit available.
And that's it! As you can see, it's a pretty straightforward process that doesn't leave much room to make mistakes.


